Proxies and Virtual Private Networks (VPNs)
Proxies and VPNs differ in nature, although they can provide some of the same services. A VPN routes all of the network traffic on a client computer through a tunnel to some other server computer. No individual application configuration is required. In contrast, using a proxy requires each application to be individually configured to ensure its traffic goes through the proxy.
The intent of a VPN is to allow a remote client computer to access network resources in some other location as if it were physically located in the same office. One of those network resources can be access to the internet, which masks the IP address of the remote computer. For this reason, VPNs have recently seen a surge in popularity as both a geo-obfuscation tool to access content not available in the client computer’s country, and as a privacy tool to prevent the client’s IP address from being discovered. A proxy is more limited in that it cannot provide access to remote resources, but it can mask your IP address and provide geo-obfuscation services.
Types of proxies
The two most common types of proxies are HTTP (Hyper Text Transfer Protocol) and SOCKS5 (Secure Sockets 5) [Link: https://www.comparitech.com/blog/vpn-privacy/socks5-proxy-vs-vpn-which-should-you-use/ ]. The SOCKS4 and SOCKS4a protocols do not support UDP or authentication. The current SOCKS5 and HTTP proxies differ in the following ways:
- In general terms, the HTTP proxy can only proxy HTTP (TCP) traffic whereas a SOCKS5 proxy can handle any type of traffic using either TCP or UDP.
- A SOCKS5 proxy does not interpret the traffic sent through it in any way whereas an HTTP proxy typically does. This means that a SOCKS5 proxy is more universal and can be used with more applications.
- An HTTP proxy can only be used with HTTP clients such as a web browser, but since it is aware of the HTTP content, it can do clever things such as caching or rewriting headers in addition to the proxying service. For the purpose of anonymity and privacy, a SOCKS5 proxy is a better choice since it can be put to more general use.
In this post we’ll look at setting up the most simple kind of SOCKS5 proxy using SSH (Secure Shell). We’ll set up an inexpensive VPS at Digital Ocean, configure the SSH server and set up a few client applications to use the proxy.
Set up the proxy server
Almost any type of VPS will work for this. Some web hosting accounts might also work since all you need is non-root SSH access, but using a web hosting account as a proxy server may violate some hosts’ terms of service. Digital Ocean is a well-known and affordable cloud provider and one of their $5/month servers [Link: https://www.digitalocean.com/pricing/#droplet ] will work well for a SSH proxy.
Digital Ocean is a Virtual Private Cloud (VPC) provider meaning that you don’t purchase a particular server. Rather, you create an account and link a payment method to it. Once you’ve done that, you can create as many virtual servers as you want. VPCs tend to offer more control over system specifications and can cost much less than a traditional VPS. There’s a good explanation of the differences between a VPS and VPC here [Link: https://www.comparitech.com/blog/vpn-privacy/whats-the-difference-between-a-vpn-vps-and-vpc/ ].
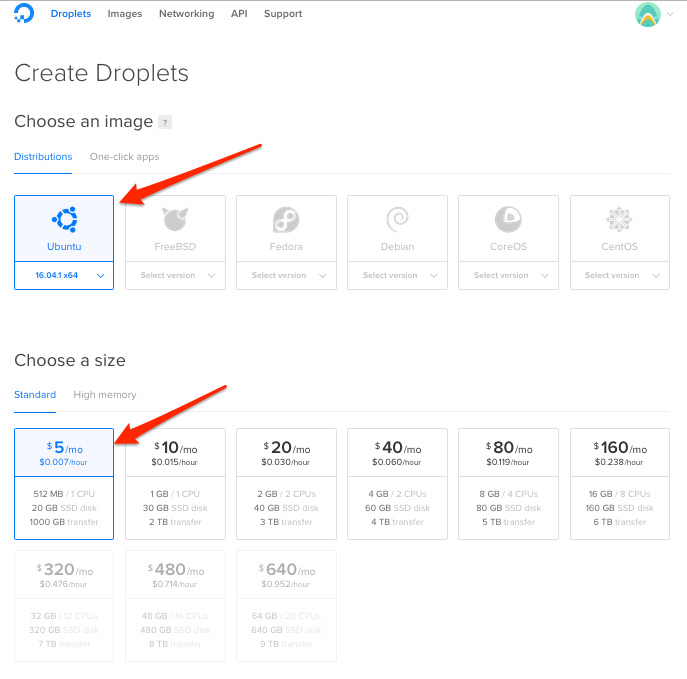
To create a Droplet, click the Droplets menu item and make a few selections to customize it. I’ve selected Ubuntu 16.04 LTS (Long Term Support) as the operating system and the smallest (least expensive) size. Droplets are charged by the hour. The least expensive option will work well and only cost about $5 for the entire month.
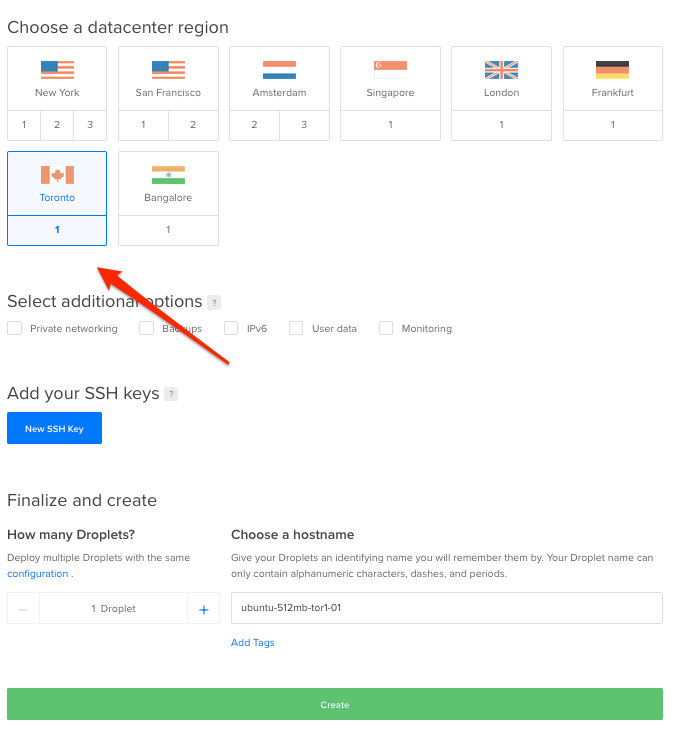
You’ll now want to select a location for your Droplet. Keep in mind that when you are using your proxy, your traffic will be seen as coming from the IP address of your Droplet. If you’re setting up a proxy specifically for geo-obfuscation purposes you should pick a location in or near the country that you wish to appear to be from.
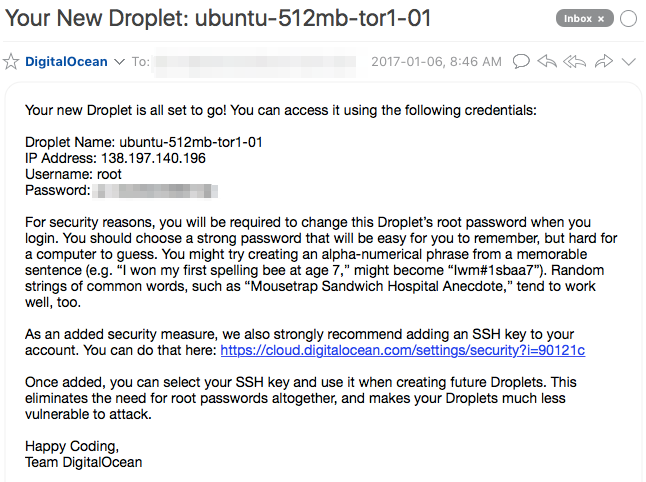
Once your Droplet has been created you will receive a confirmation email from Digital Ocean with its IP address and login information.
Configure OpenSSH on the VPS
Digital Ocean Droplets come with SSH installed and ready to go. The root user’s password is supplied in the welcome email so there’s no additional setup required on the server. But the best practice is to change the default password and create a user specifically for proxying.
Connect to the Droplet using SSH on MacOS (OSX) or Linux
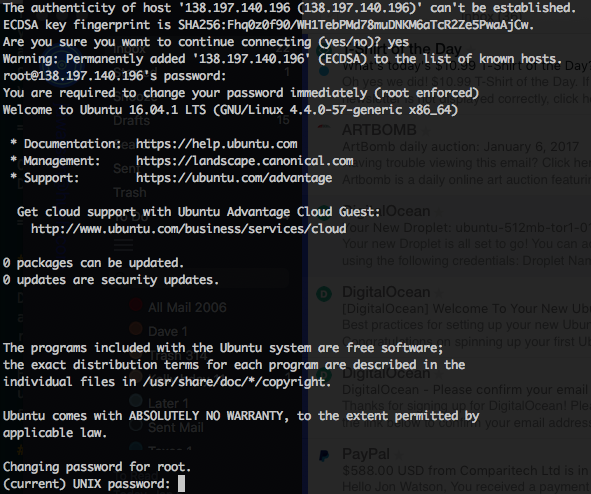
Open a terminal and type the following command to connect using the IP address from your welcome email:
ssh 66.77.88.99 -l rootYou will be prompted to accept the key. Enter the password from your welcome email, and then change the password.
Connect to the Droplet using PuTTY on Windows
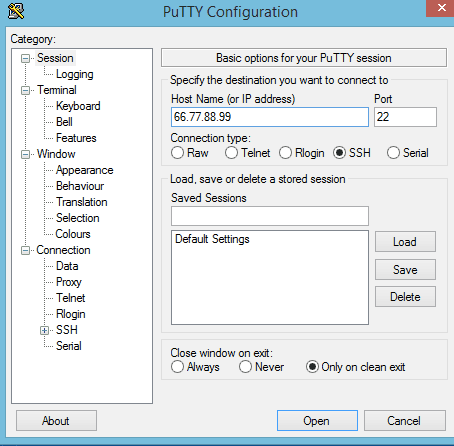
If you’re using Windows, you’ll need an SSH client to connect to your Droplet. The most widely used SSH client is PuTTY [http://www.chiark.greenend.org.uk/~sgtatham/putty/].
Enter the IP address of your Droplet into the Host Name field and click the Open button.
Ensure the system is up to date
It’s a good idea to make sure the system software is up to date. Outdated software is a leading cause of system hacks. The two commands to do this in Ubuntu are:
apt-get update
apt-get upgrade
There was very little to upgrade on my Droplet which means Digital Ocean keeps their images updated.

Add a user
The Droplet comes with one user — the all-powerful root user. It is a good security practice to add a less privileged user to the system and connect to your proxy with that account.
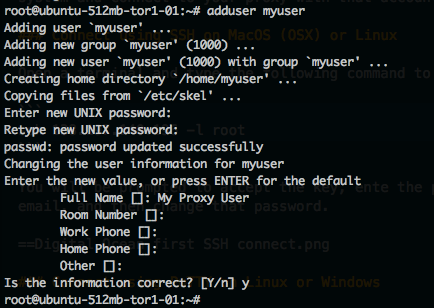
Issue the following command to add a normal user named myuser:
adduser myuserSet a password and at least a proper username. You don’t need to complete any other information.
We now have everything we need to use the proxy.
Connect to the proxy
In order to use the proxy to tunnel traffic it has to be connected. Unix-like operating systems have a built-in SSH client whereas Windows will need a third party application such as PuTTY [http://www.chiark.greenend.org.uk/~sgtatham/putty/]
Using SSH on MacOS (OSX) or Linux
The method for connecting to the proxy is the same for Linux and MacOS (OSX). Open a terminal and use SSH to connect like this:
ssh 66.77.88.99 -l myuser -D 12345Replace 66.77.88.99 with the IP address from your Digital Ocean welcome letter.
The -D switch tells the SSH client to forward traffic sent to port 12345 on your local machine to your proxy. You can use any port number you’d like as long as it is above 1024. From the help file, the -D switch:
Specifies a local “dynamic” application-level port forwarding. This works by allocating a socket to listen to port on the local side, optionally bound to the specified bind_address. Whenever a connection is made to this port, the connection is forwarded over the secure channel, and the application protocol is then used to determine where to connect to from the remote machine. Currently the SOCKS4 and SOCKS5 protocols are supported, and ssh will act as a SOCKS server.
Do not disconnect this SSH session. You can minimize it to get it out of your way because you won’t need to do anything further with it, but leave it running until you are done using the proxy.
Using PuTTY on Linux or Windows
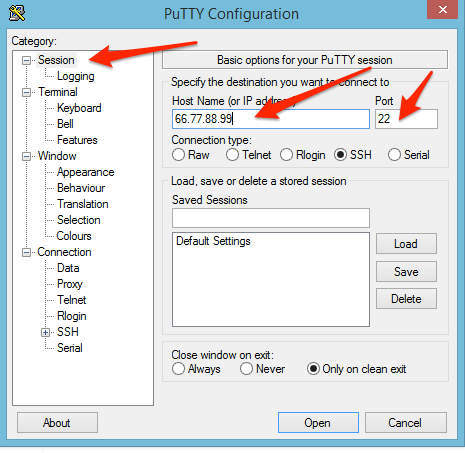
When you open PuTTY you will be in the Session tab. Enter the IP address of your Droplet and leave the port as 22.
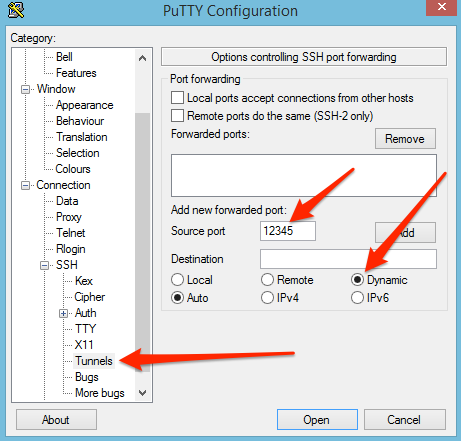
Navigate to the SSH -> Tunnels tab. Enter 12345 (or any port you’d like) into the Source portfield. Select the Dynamic radio button and click the Add button.
If you don’t want to have to do this every time you open PuTTY, navigate back to the Sessions tab, highlight the Default Settings line in the Saved Sessions list, and click the Savebutton.
Configure your browser and other applications to use the proxy
Now that you’re connected to the proxy there are three basic ways to use it:
- Set each application’s networking settings to use the proxy. Not all applications support proxies, but web browsers do.
- Use a Plugin such as the FoxyProxy plugin for Firefox and Chrome to do the application configuration for you.
- Configure the operating system itself to use the proxy for all applications.
The second option is the easiest because you can quickly enable or disable the proxy, and you can configure the browser to only use the proxy for certain sites. The other two options require a lot of flipping back and forth when you want to enable or disable the proxy.
Using the application’s built-in network settings
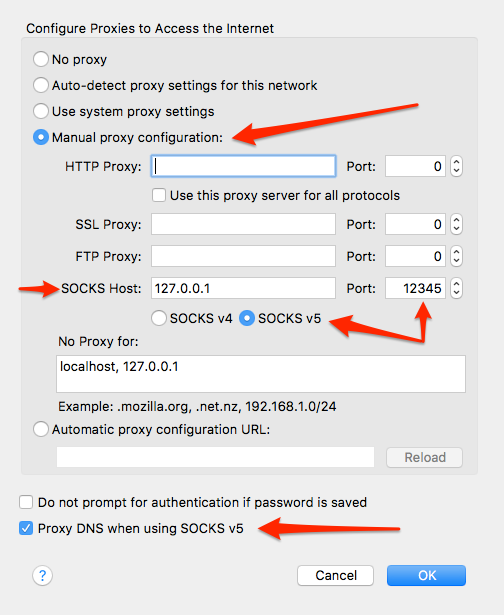
Any application that supports SOCKS5 proxies should be able to use the SSH tunnel. Simply use the proxy host IP of 127.0.0.1 (the localhost IP) and the port of 12345 (or whatever port number you’ve selected).
In Firefox the proxy settings are found in the Preferences -> Advanced -> Network -> Settings.
In Chrome, you will need to click the Advanced Settings link at the bottom of the Settings page and then navigate to Network -> Change proxy Settings. Chrome does not have its own proxy settings so this will just open your operating system’s proxy settings panel.
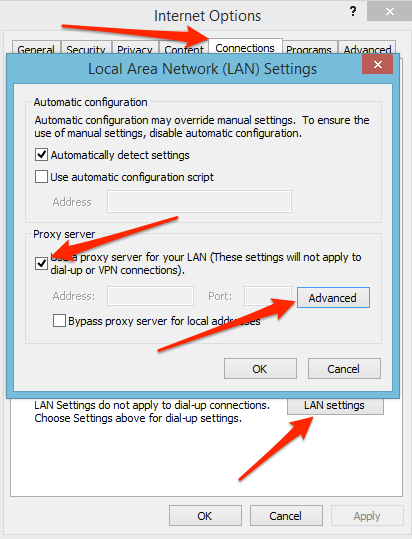
If you’re using Internet Explorer you will find your proxy settings at Internet Options -> Connections tab -> LAN Settings button. This opens up the Windows proxy settings control panel applet. Much like Chrome, there are no dedicated Internet Explorer settings for proxies.
Using a plugin for Firefox or Chrome.
There are a number of proxy plugins for Firefox and Chrome. A popular one is FoxyProxy [Link: https://getfoxyproxy.org/ ]. It sits in your browser bar and you can enable or disable the proxy by clicking on it, which is much easier than digging through your operating system or browser settings.
FoxyProxy can also be configured to exclude certain sites from using the proxy. This is useful if you want to keep the proxy running all the time, but don’t want to trip over your bank’s defenses by suddenly appearing to be in another country.
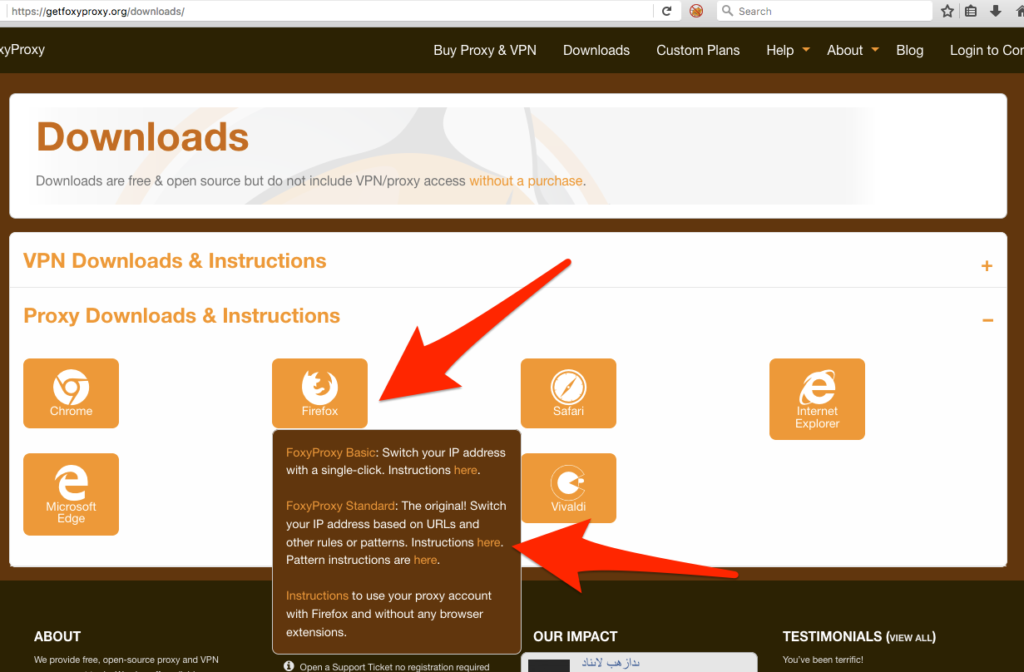
Download FoxyProxy for your browser.
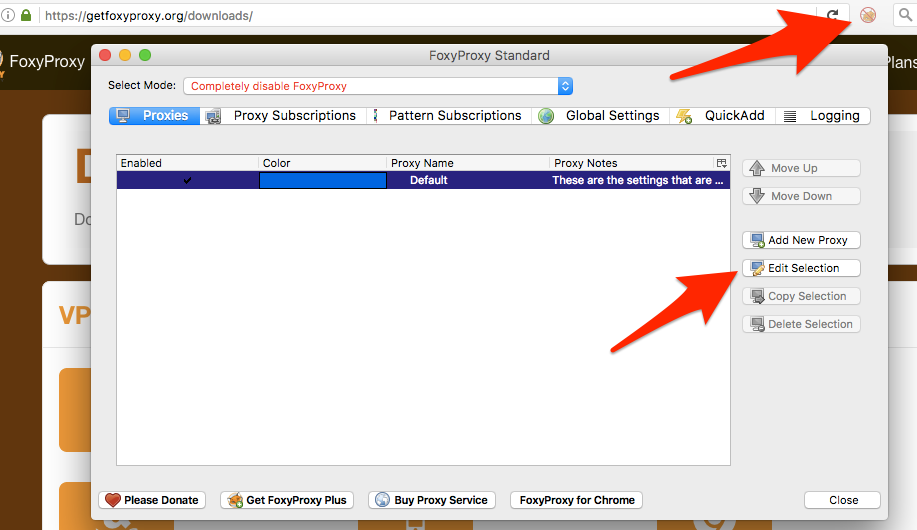
When you first launch FoxyProxy, the main window contains a proxy that’s already set up but not active. There are many options and configuration settings within FoxyProxy but we’re just going to focus on the few we need to get the proxy up and running.
Highlight the existing proxy and click the Edit Selection button.
Go to the Proxy Details tab and enter 127.0.0.1 as the Host IP Address and 12345 into the Port field.
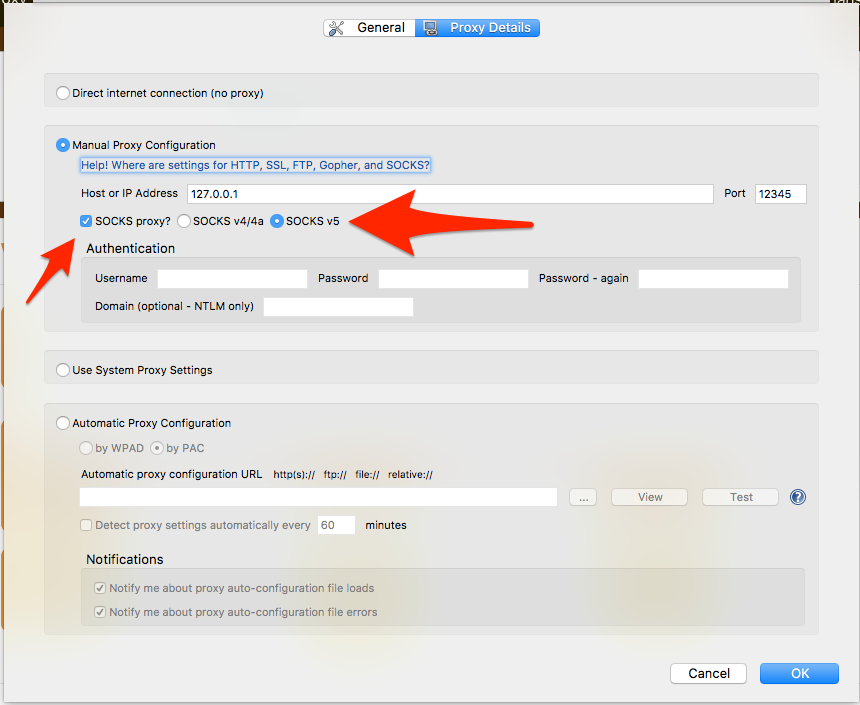
Click the SOCKS Proxy? checkbox and select the SOCKS5 radio button.
Next, click on the General tab and ensure the Perform remote DNS lookups on hostnames loading through this proxy is checked. This will help to prevent DNS leaks. It won’t completely hide you because WebRTC lookups will still work to discover your real IP address. You can use this tool to check DNS leaks [Link: https://www.comparitech.com/privacy-security-tools/dns-leak-test/ ]. There are plugins for Firefox and Google Chrome that will disable WebRTC functions.
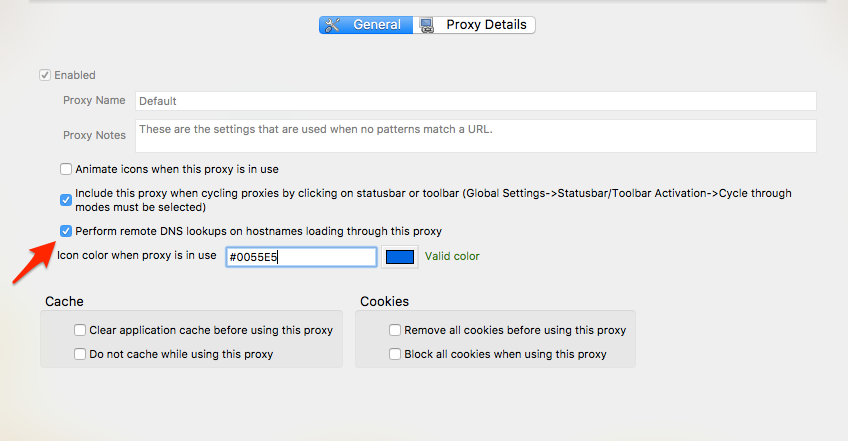
Close the FoxyProxy settings window and then activate the proxy by selecting Use proxy default
for all URLs. You can verify that your proxy is working by visiting a site like What is my IP [https://www.whatismyip.com/], where you should now see your proxy IP address instead of your ISP’s.
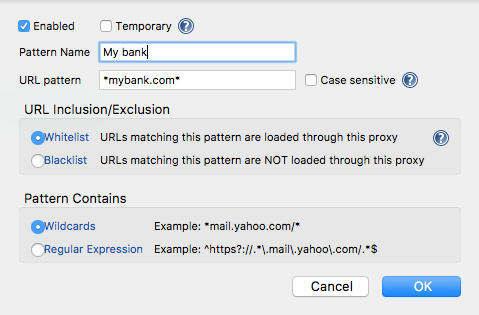
If you want to identify specific URLs to use or exclude from the proxy, you will need to create a custom proxy. Click the Add New Proxy button and you will see an additional button at the top of the settings screen named URL Patterns. Click that button to set up custom filters.

You can enter sites and patterns to match or exclude in this screen.
Using the operating system network settings
Instead of entering the proxy settings into each application, it’s possible to set the details once at the operating system level. When that is done, you’ll just need to tell each application to use the system level proxy.
Windows
You can access the Internet Options applet in Windows in two ways. Access the Control Panel -> Internet Options, or access the Internet Options from the settings menu in Internet Explorer.
From there, you can follow the instructions for Internet Explorer in the section above.
MacOS (OSX)
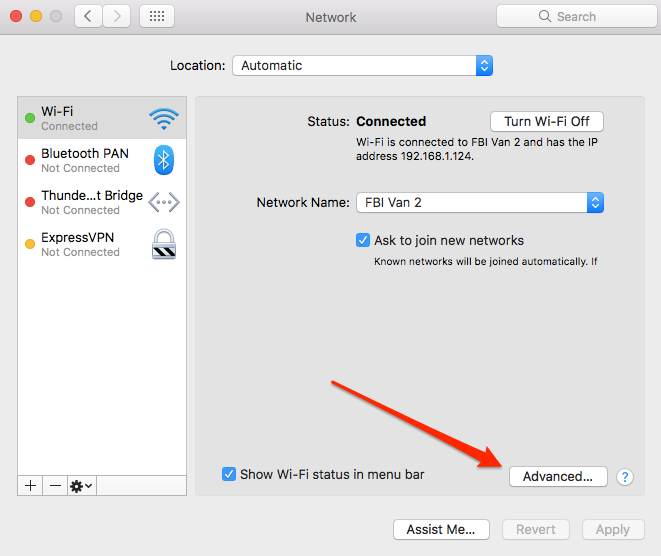
Click the Apple icon at the top left of the menu bar on your screen and select System Preferences. Select Network and then Proxies.
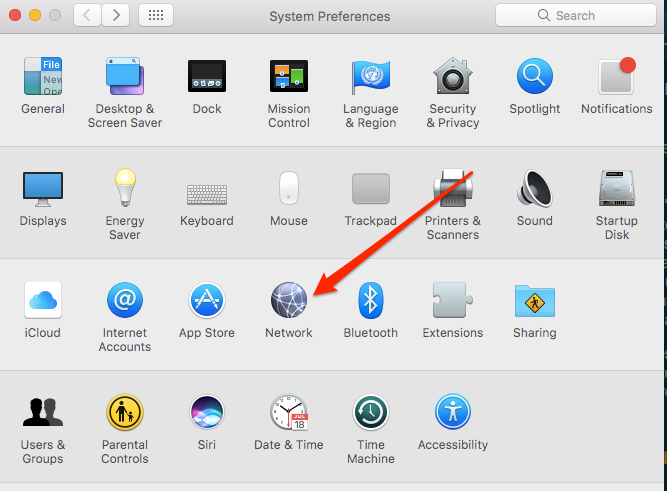
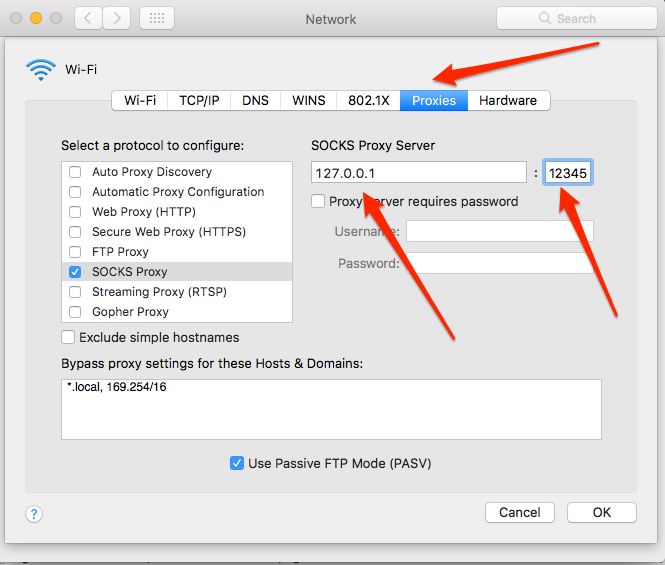
Click the Advanced button to access the Network settings and navigate to the Proxies tab.
Click the SOCKS Proxy checkbox and enter the host and port information.
Linux
Each Linux desktop environment has a different control panel item to configure the network settings. The two most common desktops are Gnome and KDE.
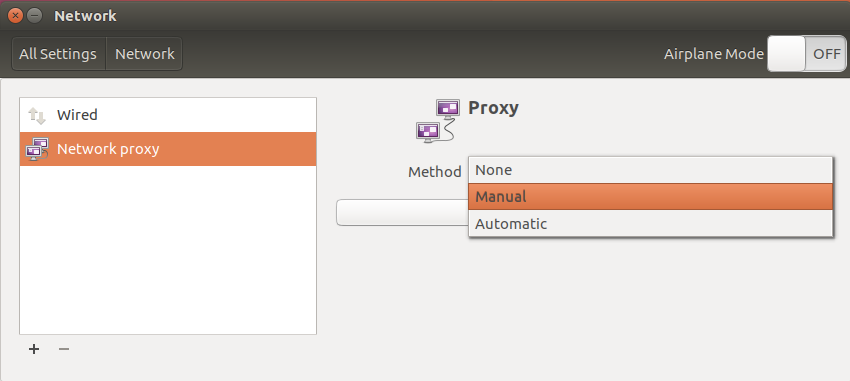
In the Gnome desktop (used by Ubuntu), the Settings -> Network panel is the place to set up the proxy.
Select the Manual option.
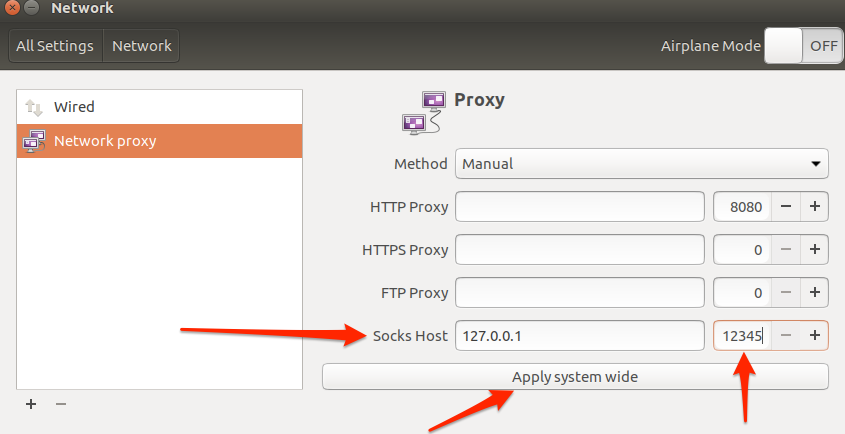
Then set the SOCKS proxy and click the Apply system wide button.
The KDE Desktop (used by Kubuntu) has the network settings in the Settings — System Settings -> Network Settings -> Proxy.
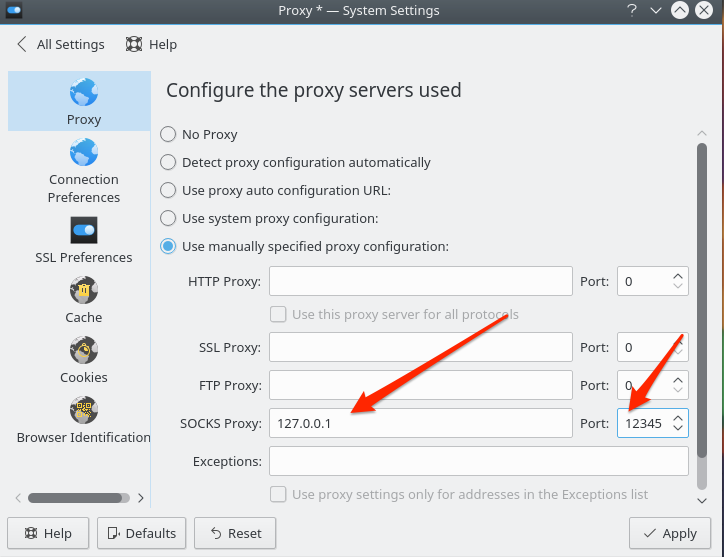
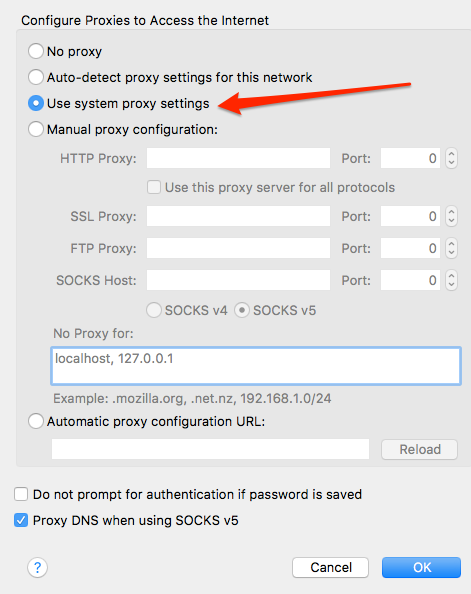
Once the proxy is set up in the operating system, each application will have to be configured to use it. That option will be in the network settings for each application. As an example, in Firefox this setting is at the top of the proxy settings.
Source: https://www.comparitech.com/blog/vpn-privacy/how-to-set-up-a-socks5-proxy-on-a-virtual-private-server-vps/
See also: https://www.comparitech.com/blog/vpn-privacy/socks5-proxy-vs-vpn-which-should-you-use/
See also: https://linode.com/docs/networking/vpn/create-a-socks5-proxy-server-with-shadowsocks-on-ubuntu-and-centos7/
